
1. 프로젝트 생성
이전 프로젝트를 일부 수정해서 proxy-start 라는 프로젝트에 넣어두었다.
1.1. 프로젝트 설정 순서
- proxy-start의 폴더 이름을 proxy로 변경하자.
- 프로젝트 임포트
- File → Open 해당 프로젝트의 build.gradle을 선택하자.
- 그 다음에 선택창이 뜨는데, Open as Project를 선택하자.
- 동작 확인
- 기본 메인 클래스 실행(ProxyApplication())
- http://localhost:8080 호출해서 Whitelabel Error Page가 나오면 정상 동작
2. 예제 프로젝트 만들기
2.1. 예제 프로젝트 만들기 v1
예제는 크게 3가지 상황으로 만든다:
- v1 - 인터페이스와 구현 클래스 - 스프링 빈으로 수동 등록
- v2 - 인터페이스 없는 구체 클래스 - 스프링 빈으로 수동 등록
- v3 - 컴포넌트 스캔으로 스프링 빈 자동 등록
2.1.1. v1 - 인터페이스와 구현 클래스 - 스프링 빈으로 수동 등록
지금까지 보아왔던 Controller, Service, Repository에 인터페이스를 도입하고, 스프링 빈으로 수동 등록해보자.
OrderRepositoryV1
package hello.proxy.app.v1;

public interface OrderRepositoryV1 {
    void save(String itemId);
}
OrderRepositoryV1Impl
package hello.proxy.app.v1;

public class OrderRepositoryV1Impl implements OrderRepositoryV1 {
    @Override
    public void save(String itemId) {
        //저장 로직
        if (itemId.equals("ex")) {
            throw new IllegalStateException("예외 발생!");
        }
        sleep(1000);
    }

    private void sleep(int millis) {
        try {
            Thread.sleep(millis);
        } catch (InterruptedException e) {
            e.printStackTrace();
        }
    }
}
OrderServiceV1
package hello.proxy.app.v1;

public interface OrderServiceV1 {
    void orderItem(String itemId);
}
OrderServiceV1Impl
package hello.proxy.app.v1;

public class OrderServiceV1Impl implements OrderServiceV1 {
    private final OrderRepositoryV1 orderRepository;

    public OrderServiceV1Impl(OrderRepositoryV1 orderRepository) {
        this.orderRepository = orderRepository;
    }

    @Override
    public void orderItem(String itemId) {
        orderRepository.save(itemId);
    }
}
OrderControllerV1
package hello.proxy.app.v1;

import org.springframework.web.bind.annotation.*;

@RequestMapping //스프링은 @Controller 또는 @RequestMapping이 있어야 스프링 컨트롤러로 인식
@ResponseBody
public interface OrderControllerV1 {
    @GetMapping("/v1/request")
    String request(@RequestParam("itemId") String itemId);

    @GetMapping("/v1/no-log")
    String noLog();
}- @RequestMapping: 스프링MVC는 타입에 @Controller 또는 @RequestMapping 애노테이션이 있어야 스프링 컨트롤러로 인식한다. 이 애노테이션은 인터페이스에 사용해도 된다.
- @ResponseBody: HTTP 메시지 컨버터를 사용해서 응답한다. 이 애노테이션은 인터페이스에 사용해도 된다.
- @RequestParam("itemId"): 인터페이스에서는 값을 생략하면 컴파일 이후 자바 버전에 따라 인식하지 못할 수 있다.
OrderControllerV1Impl
package hello.proxy.app.v1;

import lombok.extern.slf4j.Slf4j;

@Slf4j
public class OrderControllerV1Impl implements OrderControllerV1 {
    private final OrderServiceV1 orderService;

    public OrderControllerV1Impl(OrderServiceV1 orderService) {
        this.orderService = orderService;
    }

    @Override
    public String request(String itemId) {
        orderService.orderItem(itemId);
        return "ok";
    }

    @Override
    public String noLog() {
        return "ok";
    }
}
AppV1Config
package hello.proxy.config;

import hello.proxy.app.v1.*;
import org.springframework.context.annotation.Bean;
import org.springframework.context.annotation.Configuration;

@Configuration
public class AppV1Config {
    @Bean
    public OrderControllerV1 orderControllerV1() {
        return new OrderControllerV1Impl(orderServiceV1());
    }

    @Bean
    public OrderServiceV1 orderServiceV1() {
        return new OrderServiceV1Impl(orderRepositoryV1());
    }

    @Bean
    public OrderRepositoryV1 orderRepositoryV1() {
        return new OrderRepositoryV1Impl();
    }
}
ProxyApplication - 코드 추가
package hello.proxy;

import hello.proxy.config.AppV1Config;
import org.springframework.boot.SpringApplication;
import org.springframework.boot.autoconfigure.SpringBootApplication;
import org.springframework.context.annotation.Import;

@Import(AppV1Config.class)
@SpringBootApplication(scanBasePackages = "hello.proxy.app") //주의
public class ProxyApplication {
    public static void main(String[] args) {
        SpringApplication.run(ProxyApplication.class, args);
    }
}
2.1.2. 스프링 부트 3.0 변경 사항
스프링 부트 3.0(스프링 프레임워크 6.0)부터는:
- 클래스 레벨에 @RequestMapping이 있어도 스프링 컨트롤러로 인식하지 않는다. 오직 @Controller가 있어야 스프링 컨트롤러로 인식한다.
스프링 부트 3.0 미만
@RequestMapping //스프링은 @Controller 또는 @RequestMapping 이 있어야 스프링 컨트롤러로 인식
@ResponseBody
public interface OrderControllerV1 {}
스프링 부트 3.0 이상
@RestController //스프링은 @Controller, @RestController가 있어야 스프링 컨트롤러로 인식
public interface OrderControllerV1 {}
ProxyApplication - 스프링 부트 3.0 미만
@Import(AppV1Config.class)
@SpringBootApplication(scanBasePackages = "hello.proxy.app") //주의
public class ProxyApplication {}
ProxyApplication - 스프링 부트 3.0 이상
@Import(AppV1Config.class)
@SpringBootApplication(scanBasePackages = "hello.proxy.app.v3") //주의
public class ProxyApplication {}
2.2. 예제 프로젝트 만들기 v2
2.2.1. v2 - 인터페이스 없는 구체 클래스 - 스프링 빈으로 수동 등록
이번에는 인터페이스가 없는 Controller, Service, Repository를 스프링 빈으로 수동 등록해보자.
OrderRepositoryV2
package hello.proxy.app.v2;

public class OrderRepositoryV2 {
    public void save(String itemId) {
        //저장 로직
        if (itemId.equals("ex")) {
            throw new IllegalStateException("예외 발생!");
        }
        sleep(1000);
    }

    private void sleep(int millis) {
        try {
            Thread.sleep(millis);
        } catch (InterruptedException e) {
            e.printStackTrace();
        }
    }
}
OrderServiceV2
package hello.proxy.app.v2;

public class OrderServiceV2 {
    private final OrderRepositoryV2 orderRepository;

    public OrderServiceV2(OrderRepositoryV2 orderRepository) {
        this.orderRepository = orderRepository;
    }

    public void orderItem(String itemId) {
        orderRepository.save(itemId);
    }
}
OrderControllerV2
package hello.proxy.app.v2;

import lombok.extern.slf4j.Slf4j;
import org.springframework.web.bind.annotation.GetMapping;
import org.springframework.web.bind.annotation.RequestMapping;
import org.springframework.web.bind.annotation.ResponseBody;

@Slf4j
@RequestMapping
@ResponseBody
public class OrderControllerV2 {
    private final OrderServiceV2 orderService;

    public OrderControllerV2(OrderServiceV2 orderService) {
        this.orderService = orderService;
    }

    @GetMapping("/v2/request")
    public String request(String itemId) {
        orderService.orderItem(itemId);
        return "ok";
    }

    @GetMapping("/v2/no-log")
    public String noLog() {
        return "ok";
    }
}
AppV2Config
package hello.proxy.config;

import hello.proxy.app.v2.OrderControllerV2;
import hello.proxy.app.v2.OrderRepositoryV2;
import hello.proxy.app.v2.OrderServiceV2;
import org.springframework.context.annotation.Bean;
import org.springframework.context.annotation.Configuration;

@Configuration
public class AppV2Config {
    @Bean
    public OrderControllerV2 orderControllerV2() {
        return new OrderControllerV2(orderServiceV2());
    }

    @Bean
    public OrderServiceV2 orderServiceV2() {
        return new OrderServiceV2(orderRepositoryV2());
    }

    @Bean
    public OrderRepositoryV2 orderRepositoryV2() {
        return new OrderRepositoryV2();
    }
}
ProxyApplication
package hello.proxy;

import hello.proxy.config.AppV1Config;
import hello.proxy.config.AppV2Config;
import org.springframework.boot.SpringApplication;
import org.springframework.boot.autoconfigure.SpringBootApplication;
import org.springframework.context.annotation.Import;

@Import({AppV1Config.class, AppV2Config.class})
@SpringBootApplication(scanBasePackages = "hello.proxy.app")
public class ProxyApplication {
    public static void main(String[] args) {
        SpringApplication.run(ProxyApplication.class, args);
    }
}
2.3. 예제 프로젝트 만들기 v3
2.3.1. v3 - 컴포넌트 스캔으로 스프링 빈 자동 등록
이번에는 컴포넌트 스캔으로 스프링 빈을 자동 등록해보자.
OrderRepositoryV3
package hello.proxy.app.v3;

import org.springframework.stereotype.Repository;

@Repository
public class OrderRepositoryV3 {
    public void save(String itemId) {
        //저장 로직
        if (itemId.equals("ex")) {
            throw new IllegalStateException("예외 발생!");
        }
        sleep(1000);
    }

    private void sleep(int millis) {
        try {
            Thread.sleep(millis);
        } catch (InterruptedException e) {
            e.printStackTrace();
        }
    }
}
OrderServiceV3
package hello.proxy.app.v3;

import org.springframework.stereotype.Service;

@Service
public class OrderServiceV3 {
    private final OrderRepositoryV3 orderRepository;

    public OrderServiceV3(OrderRepositoryV3 orderRepository) {
        this.orderRepository = orderRepository;
    }

    public void orderItem(String itemId) {
        orderRepository.save(itemId);
    }
}
OrderControllerV3
package hello.proxy.app.v3;

import lombok.extern.slf4j.Slf4j;
import org.springframework.web.bind.annotation.GetMapping;
import org.springframework.web.bind.annotation.RestController;

@Slf4j
@RestController
public class OrderControllerV3 {
    private final OrderServiceV3 orderService;

    public OrderControllerV3(OrderServiceV3 orderService) {
        this.orderService = orderService;
    }

    @GetMapping("/v3/request")
    public String request(String itemId) {
        orderService.orderItem(itemId);
        return "ok";
    }

    @GetMapping("/v3/no-log")
    public String noLog() {
        return "ok";
    }
}
3. 요구사항 추가
기존 요구사항:
- 모든 PUBLIC 메서드의 호출과 응답 정보를 로그로 출력
- 애플리케이션의 흐름을 변경하면 안됨
- 메서드 호출에 걸린 시간
- 정상 흐름과 예외 흐름 구분
- 예외 발생시 예외 정보가 남아야 함
- 메서드 호출의 깊이 표현
- HTTP 요청을 구분
요구사항 추가:
- 원본 코드를 전혀 수정하지 않고, 로그 추적기를 적용해라.
- 특정 메서드는 로그를 출력하지 않는 기능
- 다음과 같은 다양한 케이스에 적용할 수 있어야 한다:
- v1 - 인터페이스가 있는 구현 클래스에 적용
- v2 - 인터페이스가 없는 구체 클래스에 적용
- v3 - 컴포넌트 스캔 대상에 기능 적용
4. 프록시, 프록시 패턴, 데코레이터 패턴 - 소개
4.1. 프록시 개념 이해
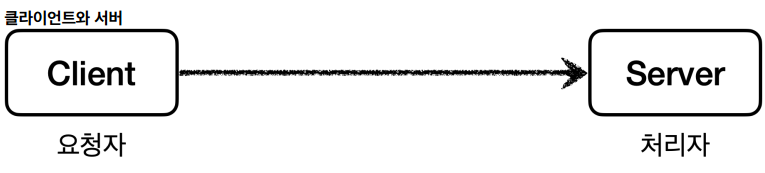
클라이언트와 서버:
- 클라이언트: 의뢰인
- 서버: 서비스나 상품을 제공하는 사람이나 물건


직접 호출과 간접 호출:
- 직접 호출: 클라이언트가 서버를 직접 호출
- 간접 호출: 클라이언트가 서버를 직접 요청하는 것이 아니라 어떤 대리자를 통해서 대신 간접적으로 서버에 요청
프록시의 기능:
- 접근 제어: 권한에 따른 접근 차단, 캐싱, 지연 로딩
- 부가 기능 추가: 요청 값이나 응답 값을 중간에 변형, 실행 시간 측정
4.2. GOF 디자인 패턴
둘다 프록시를 사용하는 방법이지만 의도(intent)에 따라서 구분:
- 프록시 패턴: 접근 제어가 목적
- 데코레이터 패턴: 새로운 기능 추가가 목적
5. 프록시 패턴 - 예제 코드
5.1. 테스트 코드에 Lombok 적용하기
build.gradle에 추가:
dependencies {
    ...
    //테스트에서 lombok 사용
    testCompileOnly 'org.projectlombok:lombok'
    testAnnotationProcessor 'org.projectlombok:lombok'
}
5.2. 프록시 패턴 - 예제 코드1
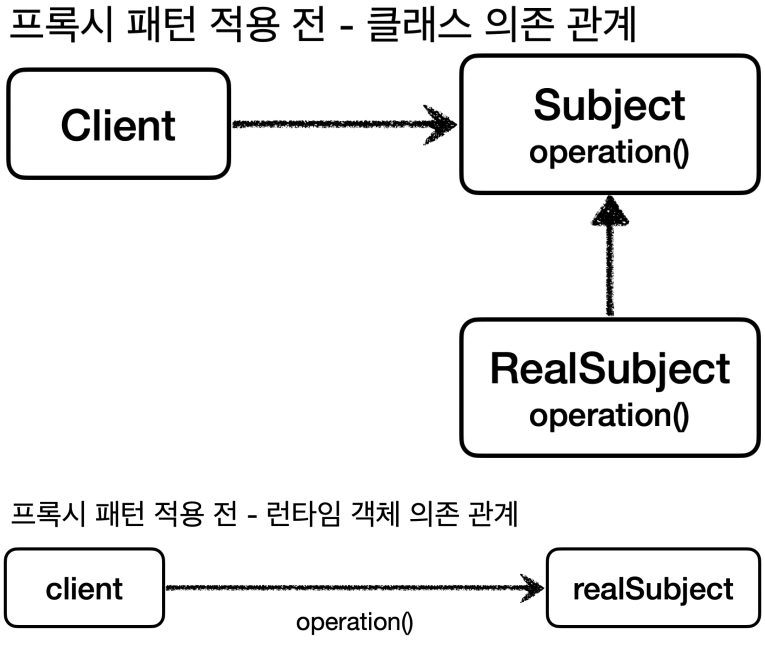
Subject 인터페이스:
package hello.proxy.pureproxy.proxy.code;

public interface Subject {
    String operation();
}
RealSubject:
package hello.proxy.pureproxy.proxy.code;

import lombok.extern.slf4j.Slf4j;

@Slf4j
public class RealSubject implements Subject {
    @Override
    public String operation() {
        log.info("실제 객체 호출");
        sleep(1000);
        return "data";
    }

    private void sleep(int millis) {
        try {
            Thread.sleep(millis);
        } catch (InterruptedException e) {
            e.printStackTrace();
        }
    }
}
ProxyPatternClient:
package hello.proxy.pureproxy.proxy.code;

public class ProxyPatternClient {
    private Subject subject;

    public ProxyPatternClient(Subject subject) {
        this.subject = subject;
    }

    public void execute() {
        subject.operation();
    }
}
ProxyPatternTest:
package hello.proxy.pureproxy.proxy;

import hello.proxy.pureproxy.proxy.code.ProxyPatternClient;
import hello.proxy.pureproxy.proxy.code.RealSubject;
import org.junit.jupiter.api.Test;

public class ProxyPatternTest {
    @Test
    void noProxyTest() {
        RealSubject realSubject = new RealSubject();
        ProxyPatternClient client = new ProxyPatternClient(realSubject);
        client.execute();
        client.execute();
        client.execute();
    }
}
5.3. 프록시 패턴 - 예제 코드2

CacheProxy:
package hello.proxy.pureproxy.proxy.code;

import lombok.extern.slf4j.Slf4j;

@Slf4j
public class CacheProxy implements Subject {
    private Subject target;
    private String cacheValue;

    public CacheProxy(Subject target) {
        this.target = target;
    }

    @Override
    public String operation() {
        log.info("프록시 호출");
        if (cacheValue == null) {
            cacheValue = target.operation();
        }
        return cacheValue;
    }
}
ProxyPatternTest - cacheProxyTest() 추가:
@Test
void cacheProxyTest() {
    Subject realSubject = new RealSubject();
    Subject cacheProxy = new CacheProxy(realSubject);
    ProxyPatternClient client = new ProxyPatternClient(cacheProxy);
    client.execute();
    client.execute();
    client.execute();
}
실행 결과:
CacheProxy - 프록시 호출
RealSubject - 실제 객체 호출
CacheProxy - 프록시 호출
CacheProxy - 프록시 호출
정리: 프록시 패턴의 핵심은 RealSubject 코드와 클라이언트 코드를 전혀 변경하지 않고, 프록시를 도입해서 접근 제어를 했다는 점이다.
6. 데코레이터 패턴 - 예제 코드
6.1. 데코레이터 패턴 - 예제 코드1
Component 인터페이스:
package hello.proxy.pureproxy.decorator.code;

public interface Component {
    String operation();
}
RealComponent:
package hello.proxy.pureproxy.decorator.code;

import lombok.extern.slf4j.Slf4j;

@Slf4j
public class RealComponent implements Component {
    @Override
    public String operation() {
        log.info("RealComponent 실행");
        return "data";
    }
}
DecoratorPatternClient:
package hello.proxy.pureproxy.decorator.code;

import lombok.extern.slf4j.Slf4j;

@Slf4j
public class DecoratorPatternClient {
    private Component component;

    public DecoratorPatternClient(Component component) {
        this.component = component;
    }

    public void execute() {
        String result = component.operation();
        log.info("result={}", result);
    }
}
6.2. 데코레이터 패턴 - 예제 코드2
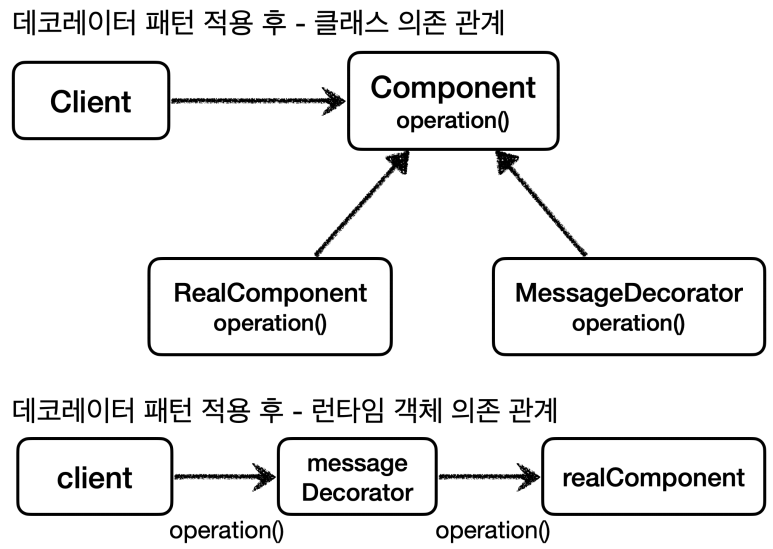
MessageDecorator:
package hello.proxy.pureproxy.decorator.code;

import lombok.extern.slf4j.Slf4j;

@Slf4j
public class MessageDecorator implements Component {
    private Component component;

    public MessageDecorator(Component component) {
        this.component = component;
    }

    @Override
    public String operation() {
        log.info("MessageDecorator 실행");
        String result = component.operation();
        String decoResult = "*****" + result + "*****";
        log.info("MessageDecorator 꾸미기 적용 전={}, 적용 후={}", result, decoResult);
        return decoResult;
    }
}
DecoratorPatternTest - 추가:
@Test
void decorator1() {
    Component realComponent = new RealComponent();
    Component messageDecorator = new MessageDecorator(realComponent);
    DecoratorPatternClient client = new DecoratorPatternClient(messageDecorator);
    client.execute();
}
6.3. 데코레이터 패턴 - 예제 코드3


TimeDecorator:
package hello.proxy.pureproxy.decorator.code;

import lombok.extern.slf4j.Slf4j;

@Slf4j
public class TimeDecorator implements Component {
    private Component component;

    public TimeDecorator(Component component) {
        this.component = component;
    }

    @Override
    public String operation() {
        log.info("TimeDecorator 실행");
        long startTime = System.currentTimeMillis();
        String result = component.operation();
        long endTime = System.currentTimeMillis();
        long resultTime = endTime - startTime;
        log.info("TimeDecorator 종료 resultTime={}ms", resultTime);
        return result;
    }
}
DecoratorPatternTest - 추가:
@Test
void decorator2() {
    Component realComponent = new RealComponent();
    Component messageDecorator = new MessageDecorator(realComponent);
    Component timeDecorator = new TimeDecorator(messageDecorator);
    DecoratorPatternClient client = new DecoratorPatternClient(timeDecorator);
    client.execute();
}
7. 프록시 패턴과 데코레이터 패턴 정리
7.1. GOF 데코레이터 패턴

데코레이터 기능에는 일부 중복이 있다. 꾸며주는 역할을 하는 Decorator들은 스스로 존재할 수 없다. 항상 꾸며줄 대상이 있어야 한다.
7.2. 프록시 패턴 vs 데코레이터 패턴
의도(intent):
- 프록시 패턴의 의도: 다른 개체에 대한 접근을 제어하기 위해 대리자를 제공
- 데코레이터 패턴의 의도: 객체에 추가 책임(기능)을 동적으로 추가하고, 기능 확장을 위한 유연한 대안 제공
정리: 프록시를 사용하고 해당 프록시가 접근 제어가 목적이라면 프록시 패턴이고, 새로운 기능을 추가하는 것이 목적이라면 데코레이터 패턴이 된다.
8. 인터페이스 기반 프록시 - 적용
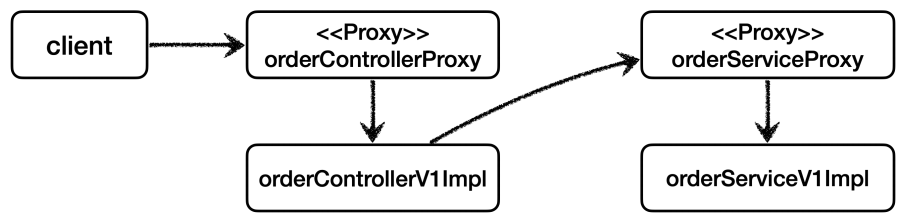
8.1. 프록시 적용 개념 이해
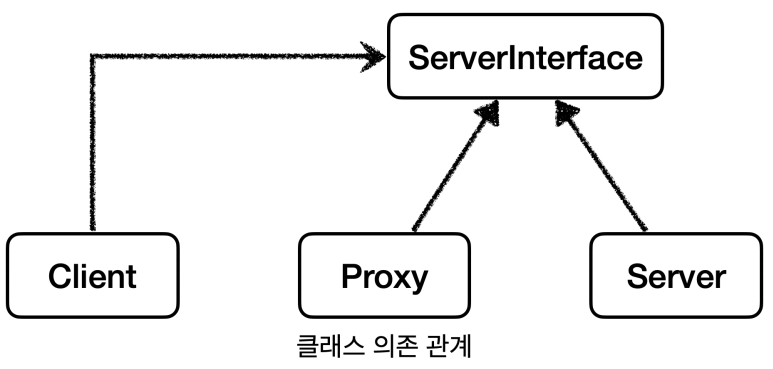
인터페이스와 구현체가 있는 V1 App에 프록시를 도입해서 LogTrace를 사용해보자. 프록시를 사용하면 기존 코드를 전혀 수정하지 않고 로그 추적 기능을 도입할 수 있다.

- OrderControllerV1Impl → OrderServiceV1Impl → OrderRepositoryV1Impl

- 애플리케이션 실행 시 실제 구현체들이 의존 관계를 맺음

- Controller , Service , Repository 각각 인터페이스에 맞는 프록시 구현체를 추가한다. (그림에서 리포지토리
는 생략했다.)
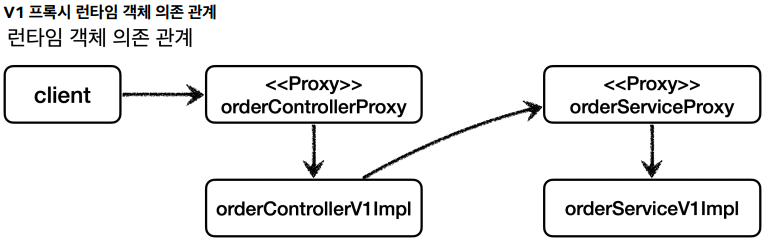
- OrderControllerInterfaceProxy → OrderServiceInterfaceProxy → OrderRepositoryInterfaceProxy
- 각 프록시는 내부에 실제 대상 객체를 참조하고 있음
8.2. OrderRepositoryInterfaceProxy
package hello.proxy.config.v1_proxy.interface_proxy;

import hello.proxy.app.v1.OrderRepositoryV1;
import hello.proxy.trace.TraceStatus;
import hello.proxy.trace.logtrace.LogTrace;
import lombok.RequiredArgsConstructor;

@RequiredArgsConstructor
public class OrderRepositoryInterfaceProxy implements OrderRepositoryV1 {
    private final OrderRepositoryV1 target;
    private final LogTrace logTrace;

    @Override
    public void save(String itemId) {
        TraceStatus status = null;
        try {
            status = logTrace.begin("OrderRepository.save()");
            // target 호출
            target.save(itemId);
            logTrace.end(status);
        } catch (Exception e) {
            logTrace.exception(status, e);
            throw e;
        }
    }
}
특징:
- OrderRepositoryV1 인터페이스를 구현한 프록시 클래스
- 실제 대상 객체(target)와 LogTrace를 의존성으로 주입받음
- 로깅 로직을 프록시에서 처리하므로 원본 코드 변경 불필요
8.3. OrderServiceInterfaceProxy
package hello.proxy.config.v1_proxy.interface_proxy;

import hello.proxy.app.v1.OrderServiceV1;
import hello.proxy.trace.TraceStatus;
import hello.proxy.trace.logtrace.LogTrace;
import lombok.RequiredArgsConstructor;

@RequiredArgsConstructor
public class OrderServiceInterfaceProxy implements OrderServiceV1 {
    private final OrderServiceV1 target;
    private final LogTrace logTrace;

    @Override
    public void orderItem(String itemId) {
        TraceStatus status = null;
        try {
            status = logTrace.begin("OrderService.orderItem()");
            // target 호출
            target.orderItem(itemId);
            logTrace.end(status);
        } catch (Exception e) {
            logTrace.exception(status, e);
            throw e;
        }
    }
}
8.4. OrderControllerInterfaceProxy
package hello.proxy.config.v1_proxy.interface_proxy;

import hello.proxy.app.v1.OrderControllerV1;
import hello.proxy.trace.TraceStatus;
import hello.proxy.trace.logtrace.LogTrace;
import lombok.RequiredArgsConstructor;

@RequiredArgsConstructor
public class OrderControllerInterfaceProxy implements OrderControllerV1 {
    private final OrderControllerV1 target;
    private final LogTrace logTrace;

    @Override
    public String request(String itemId) {
        TraceStatus status = null;
        try {
            status = logTrace.begin("OrderController.request()");
            // target 호출
            String result = target.request(itemId);
            logTrace.end(status);
            return result;
        } catch (Exception e) {
            logTrace.exception(status, e);
            throw e;
        }
    }

    @Override
    public String noLog() {
        return target.noLog();
    }
}
특징:
- noLog() 메서드는 로깅 없이 바로 target 호출
- 선택적으로 로깅 기능 적용 가능
8.5. InterfaceProxyConfig
package hello.proxy.config.v1_proxy;

import hello.proxy.app.v1.*;
import hello.proxy.config.v1_proxy.interface_proxy.*;
import hello.proxy.trace.logtrace.LogTrace;
import org.springframework.context.annotation.Bean;
import org.springframework.context.annotation.Configuration;

@Configuration
public class InterfaceProxyConfig {
    @Bean
    public OrderControllerV1 orderController(LogTrace logTrace) {
        OrderControllerV1Impl controllerImpl = new OrderControllerV1Impl(orderService(logTrace));
        return new OrderControllerInterfaceProxy(controllerImpl, logTrace);
    }

    @Bean
    public OrderServiceV1 orderService(LogTrace logTrace) {
        OrderServiceV1Impl serviceImpl = new OrderServiceV1Impl(orderRepository(logTrace));
        return new OrderServiceInterfaceProxy(serviceImpl, logTrace);
    }

    @Bean
    public OrderRepositoryV1 orderRepository(LogTrace logTrace) {
        OrderRepositoryV1Impl repositoryImpl = new OrderRepositoryV1Impl();
        return new OrderRepositoryInterfaceProxy(repositoryImpl, logTrace);
    }
}
설정 설명:
- 실제 객체 대신 프록시 객체를 스프링 빈으로 등록
- 프록시 생성 시 실제 객체와 LogTrace를 주입
- 의존 관계: 프록시 → 실제 객체 → 다음 계층 프록시
8.6. ProxyApplication
package hello.proxy;

import hello.proxy.config.v1_proxy.InterfaceProxyConfig;
import hello.proxy.trace.logtrace.LogTrace;
import hello.proxy.trace.logtrace.ThreadLocalLogTrace;
import org.springframework.boot.SpringApplication;
import org.springframework.boot.autoconfigure.SpringBootApplication;
import org.springframework.context.annotation.Bean;
import org.springframework.context.annotation.Import;

@Import(InterfaceProxyConfig.class)
@SpringBootApplication(scanBasePackages = "hello.proxy.app")
public class ProxyApplication {
    public static void main(String[] args) {
        SpringApplication.run(ProxyApplication.class, args);
    }

    @Bean
    public LogTrace logTrace() {
        return new ThreadLocalLogTrace();
    }
}
실행 결과:
[65b39db2] OrderController.request()
[65b39db2] |-->OrderService.orderItem()
[65b39db2] | |-->OrderRepository.save()
[65b39db2] | |<--OrderRepository.save() time=1002ms
[65b39db2] |<--OrderService.orderItem() time=1002ms
[65b39db2] OrderController.request() time=1003ms
정리:
- ✅ 원본 코드 전혀 수정 없이 로그 추적기 적용
- ✅ 특정 메서드(noLog) 로그 출력 제외 가능
- ✅ V1(인터페이스 기반) 적용 완료

9. 구체 클래스 기반 프록시 - 예제
9.1. 구체 클래스 기반 프록시 - 예제1
인터페이스가 없는 구체 클래스에 프록시 적용 방법 학습한다.
ConcreteLogic:
package hello.proxy.pureproxy.concreteproxy.code;

import lombok.extern.slf4j.Slf4j;

@Slf4j
public class ConcreteLogic {
    public String operation() {
        log.info("ConcreteLogic 실행");
        return "data";
    }
}
ConcreteClient:
package hello.proxy.pureproxy.concreteproxy.code;

public class ConcreteClient {
    private ConcreteLogic concreteLogic;

    public ConcreteClient(ConcreteLogic concreteLogic) {
        this.concreteLogic = concreteLogic;
    }

    public void execute() {
        concreteLogic.operation();
    }
}
기본 테스트:
@Test
void noProxy() {
    ConcreteLogic concreteLogic = new ConcreteLogic();
    ConcreteClient client = new ConcreteClient(concreteLogic);
    client.execute();
}
9.2. 구체 클래스 기반 프록시 - 예제2
클래스 상속을 통한 프록시 구현
TimeProxy:
package hello.proxy.pureproxy.concreteproxy.code;

import lombok.extern.slf4j.Slf4j;

@Slf4j
public class TimeProxy extends ConcreteLogic {
    private ConcreteLogic realLogic;

    public TimeProxy(ConcreteLogic realLogic) {
        this.realLogic = realLogic;
    }

    @Override
    public String operation() {
        log.info("TimeDecorator 실행");
        long startTime = System.currentTimeMillis();
        String result = realLogic.operation();
        long endTime = System.currentTimeMillis();
        long resultTime = endTime - startTime;
        log.info("TimeDecorator 종료 resultTime={}", resultTime);
        return result;
    }
}
프록시 적용 테스트:
@Test
void addProxy() {
    ConcreteLogic concreteLogic = new ConcreteLogic();
    TimeProxy timeProxy = new TimeProxy(concreteLogic);
    ConcreteClient client = new ConcreteClient(timeProxy);
    client.execute();
}
다형성 원리:
- ConcreteClient는 ConcreteLogic 타입을 의존
- TimeProxy는 ConcreteLogic을 상속받았으므로 할당 가능
- 클라이언트 코드 변경 없이 프록시 적용 가능
실행 결과:
TimeDecorator 실행
ConcreteLogic 실행
TimeDecorator 종료 resultTime=1
10. 구체 클래스 기반 프록시 - 적용
10.1. OrderRepositoryConcreteProxy
package hello.proxy.config.v1_proxy.concrete_proxy;

import hello.proxy.app.v2.OrderRepositoryV2;
import hello.proxy.trace.TraceStatus;
import hello.proxy.trace.logtrace.LogTrace;

public class OrderRepositoryConcreteProxy extends OrderRepositoryV2 {
    private final OrderRepositoryV2 target;
    private final LogTrace logTrace;

    public OrderRepositoryConcreteProxy(OrderRepositoryV2 target, LogTrace logTrace) {
        this.target = target;
        this.logTrace = logTrace;
    }

    @Override
    public void save(String itemId) {
        TraceStatus status = null;
        try {
            status = logTrace.begin("OrderRepository.save()");
            // target 호출
            target.save(itemId);
            logTrace.end(status);
        } catch (Exception e) {
            logTrace.exception(status, e);
            throw e;
        }
    }
}
10.2. OrderServiceConcreteProxy
package hello.proxy.config.v1_proxy.concrete_proxy;

import hello.proxy.app.v2.OrderServiceV2;
import hello.proxy.trace.TraceStatus;
import hello.proxy.trace.logtrace.LogTrace;

public class OrderServiceConcreteProxy extends OrderServiceV2 {
    private final OrderServiceV2 target;
    private final LogTrace logTrace;

    public OrderServiceConcreteProxy(OrderServiceV2 target, LogTrace logTrace) {
        super(null);
        this.target = target;
        this.logTrace = logTrace;
    }

    @Override
    public void orderItem(String itemId) {
        TraceStatus status = null;
        try {
            status = logTrace.begin("OrderService.orderItem()");
            // target 호출
            target.orderItem(itemId);
            logTrace.end(status);
        } catch (Exception e) {
            logTrace.exception(status, e);
            throw e;
        }
    }
}
클래스 기반 프록시의 단점:
- super(null): 부모 클래스 생성자 강제 호출 필요
- 부모 클래스가 기본 생성자 없을 때 파라미터 처리 필요
- 프록시는 부모 기능 사용 안하지만 문법상 호출 필수
10.3. OrderControllerConcreteProxy
package hello.proxy.config.v1_proxy.concrete_proxy;

import hello.proxy.app.v2.OrderControllerV2;
import hello.proxy.trace.TraceStatus;
import hello.proxy.trace.logtrace.LogTrace;

public class OrderControllerConcreteProxy extends OrderControllerV2 {
    private final OrderControllerV2 target;
    private final LogTrace logTrace;

    public OrderControllerConcreteProxy(OrderControllerV2 target, LogTrace logTrace) {
        super(null);
        this.target = target;
        this.logTrace = logTrace;
    }

    @Override
    public String request(String itemId) {
        TraceStatus status = null;
        try {
            status = logTrace.begin("OrderController.request()");
            // target 호출
            String result = target.request(itemId);
            logTrace.end(status);
            return result;
        } catch (Exception e) {
            logTrace.exception(status, e);
            throw e;
        }
    }
}
10.4. ConcreteProxyConfig
package hello.proxy.config.v1_proxy;

import hello.proxy.app.v2.OrderControllerV2;
import hello.proxy.app.v2.OrderRepositoryV2;
import hello.proxy.app.v2.OrderServiceV2;
import hello.proxy.config.v1_proxy.concrete_proxy.*;
import hello.proxy.trace.logtrace.LogTrace;
import org.springframework.context.annotation.Bean;
import org.springframework.context.annotation.Configuration;

@Configuration
public class ConcreteProxyConfig {
    @Bean
    public OrderControllerV2 orderControllerV2(LogTrace logTrace) {
        OrderControllerV2 controllerImpl = new OrderControllerV2(orderServiceV2(logTrace));
        return new OrderControllerConcreteProxy(controllerImpl, logTrace);
    }

    @Bean
    public OrderServiceV2 orderServiceV2(LogTrace logTrace) {
        OrderServiceV2 serviceImpl = new OrderServiceV2(orderRepositoryV2(logTrace));
        return new OrderServiceConcreteProxy(serviceImpl, logTrace);
    }

    @Bean
    public OrderRepositoryV2 orderRepositoryV2(LogTrace logTrace) {
        OrderRepositoryV2 repositoryImpl = new OrderRepositoryV2();
        return new OrderRepositoryConcreteProxy(repositoryImpl, logTrace);
    }
}
10.5. ProxyApplication 설정
@Import(ConcreteProxyConfig.class)
@SpringBootApplication(scanBasePackages = "hello.proxy.app")
public class ProxyApplication {
    // ... 기존 코드 동일
}
실행 결과: V2 애플리케이션에도 로그 추적 기능 정상 적용
11. 인터페이스 기반 프록시와 클래스 기반 프록시 비교
11.1. 인터페이스 기반 프록시
장점:
- 인터페이스만 같으면 모든 곳에 적용 가능
- 상속 제약에서 자유로움
- 역할과 구현 명확하게 분리
- 다형성 활용 최적화
단점:
- 인터페이스가 반드시 필요
- 인터페이스 없으면 적용 불가
11.2. 클래스 기반 프록시
장점:
- 인터페이스 없어도 적용 가능
- 구체 클래스만 있으면 프록시 생성 가능
단점:
- 해당 클래스에만 적용 가능
- 상속 사용으로 인한 제약:
- 부모 클래스 생성자 강제 호출(super())
- final 클래스는 상속 불가
- final 메서드는 오버라이딩 불가
- 캐스팅 관련 추가 고려사항
11.3. 실무 적용 고려사항
이론적 관점:
- 모든 객체에 인터페이스 도입 → 역할/구현 분리 → 유연성 향상
실용적 관점:
- 변경 가능성 없는 코드에 무조건 인터페이스 도입은 번거로움
- 실무에서는 인터페이스 있는 경우(V1)와 없는 경우(V2) 모두 존재
결론:
- 두 가지 상황(V1, V2) 모두 대응할 수 있어야 함
- 프로젝트 상황과 요구사항에 맞는 선택 필요
- 일반적으로 인터페이스 기반이 더 유연하지만, 구체 클래스 기반도 필요 상황 존재
12. 정리
12.1. 성과
✅ 요구사항 완벽 충족:
- 원본 코드 전혀 수정 없이 로그 추적기 적용
- 특정 메서드 로그 출력 제외 기능 구현
- V1(인터페이스 기반), V2(구체 클래스 기반) 모두 적용 가능
✅ 프록시 패턴/데코레이터 패턴 활용:
- 프록시 패턴: 접근 제어(캐싱 등)
- 데코레이터 패턴: 부가 기능 추가(로깅, 트랜잭션 등)
12.2. 문제점
❌ 너무 많은 프록시 클래스:
- 대상 클래스마다 프록시 클래스 필요
- 100개 클래스 → 100개 프록시 클래스
- 로직 중복 심각(모두 LogTrace 사용)
프록시 클래스 구조:
java
public class XXXProxy implements XXX {
    private final XXX target;
    private final LogTrace logTrace;

    @Override
    public void method() {
        // 모든 프록시에 동일한 로깅 로직
        TraceStatus status = null;
        try {
            status = logTrace.begin("...");
            target.method();
            logTrace.end(status);
        } catch (Exception e) {
            logTrace.exception(status, e);
            throw e;
        }
    }
}
12.3. 해결 방향
동적 프록시 기술 필요:
- 런타임에 프록시 객체 동적 생성
- 반복되는 프록시 생성 로직 제거
- 하나의 핸들러로 여러 클래스 처리 가능
다음 단계:
- JDK 동적 프록시
- CGLIB
- 프록시 팩토리 빈
- 빈 후처리기
이러한 문제점들을 해결하기 위해 동적 프록시 기술을 학습하게 된다. 동적 프록시를 통해 반복적인 프록시 클래스 생성 문제를 해결하고, 더 유연하고 효율적인 프록시 적용 방법을 배울 수 있다.
'Spring > Core' 카테고리의 다른 글
| [Advanced-6] 스프링 지원 프록시 (0) | 2026.01.02 |
|---|---|
| [Advanced-5] 동적 프록시 기술 (0) | 2026.01.02 |
| [Advanced-3] 템플릿 메서드 패턴과 콜백 패턴 (0) | 2025.12.31 |
| [Advanced-2] 스레드 로컬 - ThreadLocal (0) | 2025.12.31 |
| [Advanced-1] 예제 만들기 (0) | 2025.12.30 |